User manual
Introduction
Congratulations! You just got your hands on your Tanmatsu, we bet you’re excited to get started so let’s not delay and get right to it!
Connectors and buttons
There are a lot of connectors and buttons on Tanmatsu, let’s start with the basics: how do you turn the device on and off?
Right side
On the right side of the device you will find three buttons and a couple of connectors.
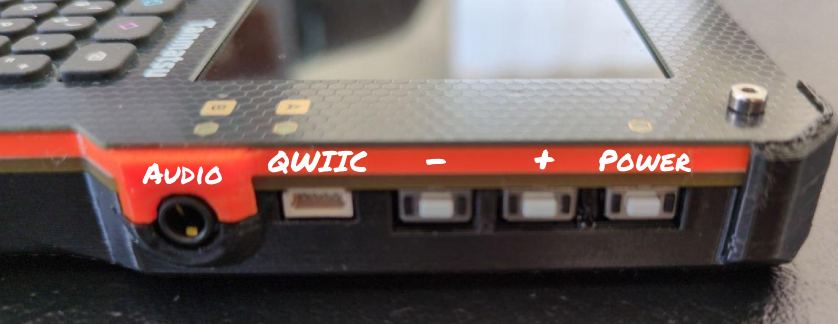
From the top the first button is the power button. Pressing this button for 2.5 seconds will power on the device. If you want to turn off the device simply hold it for half a second.
The + and - buttons normally have software defined functions, for example changing audio volume. Since the function depends on the software the function of these buttons will differ between applications. In the launcher the buttons are currently unused.
The - button also allows for device recovery in case the installed firmware somehow makes it impossible to connect to the device via USB. Simply press the - button while powering on the device to force the ESP32-P4 application processor into bootloader mode. In this mode you can flash firmware using esptool.py or using the web recovery application.
The QWIIC connector allows for connecting accessories. QWIIC, otherwise called STEMMA QT is a standard developed by Sparkfun and Adafruit that makes use of a JST style SH 1.0mm pitch connector to connect accessories via I2C communication. The port on Tanmatsu makes use of two separate GPIO pins, allowing you to use the two data lines for any application. The ESP32-P4 application processor can expose multiple peripherals on these pins, for example I2C (controller and peripheral), I3C (controller only) and UART.
The audio connector allows for connecting headphones. The audio codec on Tanmatsu allows setting the audio volume level separately from the digital audio data stream coming from the application processor.
Left side
On the left side of the device you will find a USB-A host port, the SD card reader and the CATT connector.
The USB-A port is connected directly to the ESP32-P4 application processor and is capable of 480mbit USB 2.0 speeds. The launcher software currently does not implement any functionality that utilizes this port but apps can of course make use of it.
The SD card slot allows expanding the storage of your Tanmatsu using a FAT32 formatted micro SD card.
The CATT port exposes 8 GPIOs and 3.3v in a layout that is compatible with both PMOD and SAO type expansion boards. Or you can connect breadboard wires for experimenting.
Top side
The top side of the device features the USB-C port and the LoRa antenna SMA connector.
Charging your Tanmatsu
You can charge your Tanmatsu by plugging in a power source (phone charger or computer) into the USB-C port. Tanmatsu will automatically power on when a power source is detected and battery charging will start automatically.
Tanmatsu will only charge when on or in sleep mode. If Tanmatsu is powered off the battery will not be charged even with a power source connected to the USB-C port. The launcher firmware for Tanmatsu includes a mode which turns off the radio, display and keyboard backlight before putting the ESP32-P4 application processor into deep sleep mode. You can enter this mode by pressing the power button for less than half a second. You can check if your Tanmatsu is charging by looking at the color of the power LED.
The power LED
Tanmatsu has multiple LEDs on its frontpanel. The LED at the top-left corner serves as power LED. The color of this the power LED usually indicates the state of the power management system.
The power LED is GREEN when the device is running on battery, YELLOW when charging, MAGENTA when the battery has not been detected and blinking RED if a fault has occurred. When a fault occurs charging is automatically stopped.
PMIC status LED
There is a small red LED on the back of the main board. This LED provides additional status information about the state of the power management system of Tanmatsu.
Off: the battery is not being charged
Slow blinking: a PMIC fault has occurred
Rapid blinking: Tanmatsu is trying to charge the battery but no battery is connected
PMIC stands for “Power Management Integrated Circuit”. Tanmatsu uses a BQ25895 PMIC from Texas Instruments to manage battery charging.
Power fault conditions
A fault should not be an immediate cause of concern, but if a fault condition occurs repeatedly or the battery of your Tanmatsu no longer retains charge properly please consider replacing it. Tanmatsu contains a multiple layers of protection to prevent any damage to your device, the battery and it’s surroundings. If charging is stopped due to a fault then most likely there is something wrong with your battery.
The protection functions built into the Tanmatsu mainboard will, in addition to the battery protection circuit built into the battery itself, stop charging if it detects that the battery voltage is below the minimum safe threshold for a Lithium Polymer battery or above the maximum voltage threshold of a Lithium Polymer battery. In both cases the power LED will rapidly blink in red and the small red LED on the back of the mainboard will turn off or start blinking slowly.
A situation that can trigger the under-voltage protection is a situation where the battery has drained below it’s rated minimum voltage due to degradation when left completely empty for a long period of time. In this situation is is also possible that the battery simply is not detected, in which case the power LED will turn red when an external power source is connected. If the battery has accidentally reached a voltage below 3 volt then the battery will be disconnected to protect it. Normally the battery voltage recovers a bit automatically after leaving the battery alone for a few minutes. In this situation you can safely restart start charging the battery again after the voltage has reached it’s normal level.
The battery supplied with your Tanmatsu has a built-in protection circuit preventing the battery from draining below it’s minimum rated voltage during normal use.
As a general warning, keep in mind the following: a Lithium Polymer battery that has reached a voltage below 2.5 volt for a prolonged period of time can become chemically unstable, we recommend replacing the battery if your battery has drained below 2.5 volt. Recharging a Lithium Polymer battery that has been subjected to a situation where it reached a voltage of less than 2.5 volt can be dangerous, the battery may for example swell up and could potentially damage the device or it’s surroundings.
Connecting via USB
By default a Tanmatsu connected to a PC using its USB-C port will show up as one or two (if the radio is enabled) USB-serial/JTAG peripherals. Connecting to the serial interface using a terminal emulator program allows you to see the debug output of the currently running firmware. In this mode you can install new firmware (which will replace the launcher firmware completely) if you wish to do so. It is also possible to use the recovery website to reinstall the launcher firmware.
Pressing the purple diamond key while on the home screen of the launcher firmware will switch the USB connection into BadgeLink mode. Using BadgeLink you can install firmware binaries to a special partition which allows starting firmware as an app. Firmware installed to this partition shows up in the apps menu of the launcher firmware. It also allows for managing files on the FAT filesystem on the internal flash and the SD card, as well as management of configuration parameters.